Azure VPS setup notes » History » Revision 19
« Previous |
Revision 19/65
(diff)
| Next »
Jon Goldberg, 01/21/2021 09:22 PM
{{last_updated_at}} by {{last_updated_by}}
Microsoft Azure - Setup
For the Client
Hi there! If I've directed you to this page, the part that concerns you are the first two sections only. It's a bit convoluted, so feel free to ask me if you run into trouble! -Jon
[NOTE: Most of Microsoft's pages break with an ad blocker enabled.]
Get a Sponsorship
- Go to the Nonprofit Microsoft Getting Started page. Fill out the paperwork to be approved as a 501c3. Approval can take 1 day or 3-4 weeks - I've seen both multiple times.
- Once approved, go to https://www.microsoft.com/en-us/nonprofits/azure to claim credits (or go directly to Claiming Your Credits.
- You'll know your successful because you'll see a sponsorship listed on the Sponsorship Page.
Create a Subscription
- Check that you have credits in your sponsored account: https://www.microsoftazuresponsorships.com/Balance
- Visit the Azure Portal.
- Click the Subscriptions icon.
- Click the Add button.
- Add a subscription of type "Microsoft Azure Sponsorship" from the Azure portal. You will likely need to select Show other subscription types to see it.
- Note: Even sponsored subscriptions require a credit card, make sure you have one available.
Technical Configuration
To set up a free account, you must:
- Get a Sponsorship (see above)
- Create a Subscription linked to the Sponsorship (see above)
- (Strongly recommended) Grant access to the subscription to other users.
- Create a Resource Group linked to the Subscription
- Create a Virtual Machine (and associated resources) linked to the Resource Group
Grant access to other users
Microsoft logins now require 2-factor authentication, and the client owns the main account. The web vendor (Megaphone Tech, presumably) needs separate logins.
Source for instructions
- Open the new subscription.
- Click Access Control (IAM) in the left navigation bar.
- Under Grant access to this resource, click Add role assignments.
- Role should be Owner. In Search by name or email address, put the email of the new user and press Save. At this point, they'll receive an email to either log in with an existing Microsoft account or to create a new one. With the owner role, the rest of this setup can be done as easily from their account.
Create a resource group
- Select "Resource Group" from the main Azure portal.
- Select Add and give it a name.
- Your subscription should be pre-selected since you only have the one.
- Click Review and Create.
Create a virtual machine
- Click on your new resource group in the Azure Portal.
- Click Add.
- Search for the name of the image you want (e.g. Debian).
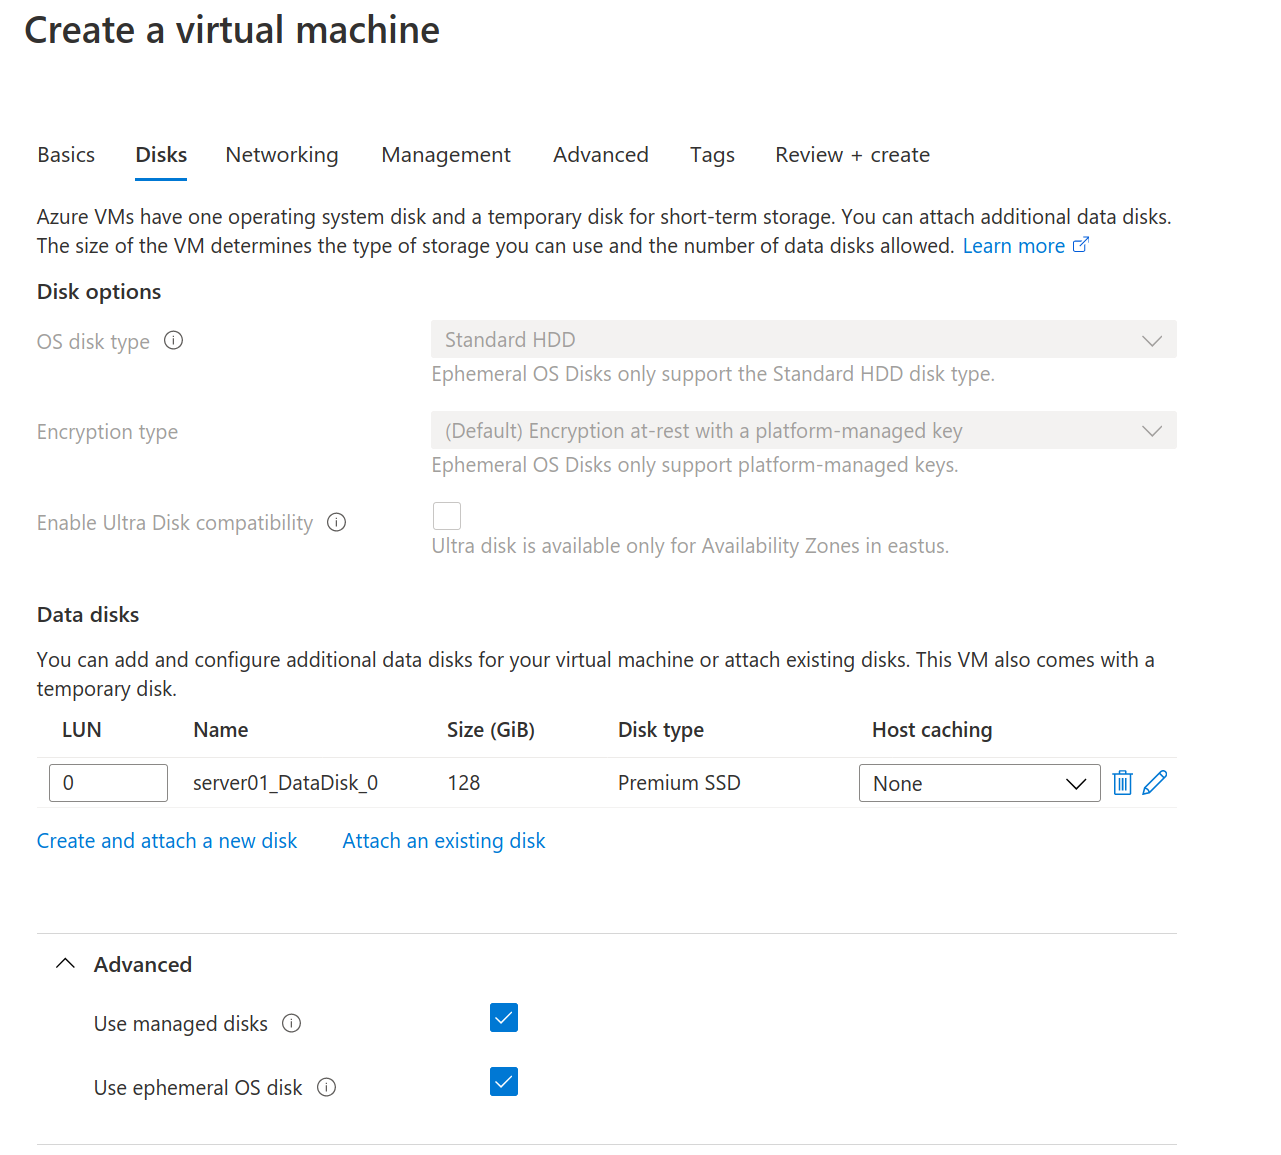
- See the screenshots below for configuration of the "Basics" and "Disk" tabs. The other tabs I keep with the defaults.
- I've attached a downloaded template for this VM, which as of now I haven't used yet, not sure how it works.
.png)
Post-provisioning configuration
Partition and format the attached disk
Your VM (if it's D2s v3) will have an "OS disk" of 30GB it ships with. Your attached disk is unformatted. Partition and format the new disk with:
sudo parted --script -a optimal /dev/sdc mklabel gpt -- mkpart primary ext4 '0%' '100%'
sudo mkfs -t ext4 /dev/sdc1
NOTE At different times, Azure may attach the disk as /dev/sdb or /dev/sdc. Usefdisk -l` to determine the correct disk to work with.
Ensure access to the serial console
- Select your virtual machine in the Azure Portal.
- In the left navigation, select Serial console. You may be told you don't have access. You will need at least one account where the password has been set. You may also need to create a "custom storage account" by going to Boot diagnostics in the virtual machine's left navigation and selecting Settings. Rebooting at this point may also be necessary.
Mount the attached disk
NOTE As of January 2021, running init 1 no longer works to bring a system into single-user mode. You must reboot from within the serial console and edit GRUB. Note that in Debian, you need to hold Escape at startup to get into GRUB configuration.
Using the Microsoft Azure serial console, follow these directions for moving the contents of the /var directory to the attached disk and mount it.
Modify Firewall Rules
- Click on your new virtual machine in the Azure portal.
- Click Networking in the side navigation.
- You should see your firewall settings. They should look like the screenshot below, except they'll be missing the two items circled.
- Add the "allow_ping" and "Port_5665" rules to the Inbound Port Rules as shown in the screenshot.
.png)
Add a swapfile
Complete instructions are here but in short, add this to /etc/waagent.conf for an 8GB swapfile:
    ResourceDisk.Format=y
    ResourceDisk.EnableSwap=y
    ResourceDisk.SwapSizeMB=8192
Then run service walinuxagent restart.
Updated by Jon Goldberg over 5 years ago · 65 revisions